Discover how to quickly and easily add buttons to your knitting projects without having to sew them on and without creating even more ends to weave in.
Disclosure: This tutorial may include affiliate links. This means when you use these links, and make a purchase from that website, that The Fated Knitter will earn a commission from that sale. This does not cost you any extra, but helps support my business.
The Pains
Sewing on buttons has always been a little bit of a tedious task for me.
It’s not a difficult one. It’s just… I wish the buttons would sew themselves on.
And there’s always at least one that doesn’t go on straight. It’s always in the wrong place. Not lots. Just enough to annoy you.
The Ah-Ha!
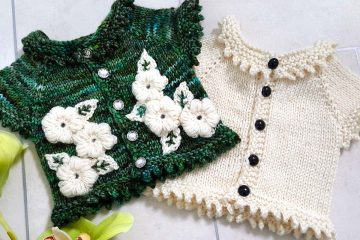
Recently I’ve been knitting lots of preemie baby cardigans for the Warm Baby Project.
If you want the pattern I’ve been using it’s free here.
Anyway, as I was knitting it dawned on me that I could use a technique typically used with lace, but for my buttons.
That is… to add the button directly on to the stitch with a crochet hook!
When you knit a buttonhole, the button needs to be added to the corresponding opposite side. Right?
So if we knit the buttonhole and add the button to the same row, then they are both in exact alignment to each other, and the biggest bonus is you don’t need to sew on the button later (or weave in any extra ends).
Game changing or what!?
A quick disclaimer!
Please note that this only creates perfect alignment on garments where the button bands are knit in with the main body of the garment. Where button bands are knitted on after you can still use this technique but you will need to calculate where they mirror the buttonholes or you may not get perfect alignment, but you can still absolutely avoid the sewing part.
You will need…
This technique that I’m about to show you works best with shank style buttons. These are the ones with a loop at the back of the button, instead of holes through the front. As someone who makes a lot of baby cardigans buying these in bulk is much more cost effective, and I am always using these 10mm black buttons *(links to eBay) and these 10mm rhinestone buttons *(links to eBay).
It does kind of work with 2-hole buttons, but not 4-hole buttons.
You will also need your knitting and either a small crochet hook (1mm or smaller) or dental floss.
The Tutorial
If you’re not familiar with the technique or need a refresh, then please keep reading…
1. Decide which stitch you are adding your button to. Knit the stitch as usual. In all of my baby cardigan patterns (like the one I linked to above) I add the button to the third stitch from the end as this mirrors the position of the buttonhole at the start of the row.
2. Optional but I find slipping the stitch back to the left hand needle easier to pick up with the crochet hook.
3. Slip the crochet hook through the shank of your button.
4. Slip the crochet hook through your stitch.
5. Use the crochet hook to pull the stitch through the button shank.
6. Place the stitch back on the right hand needle.
7. Remember to turn your button so it faces the right side of your work!
8. Continue knitting the pattern and repeat the above for any more buttons.
Dental Floss: If you are using dental floss you will need to thread one end of the floss through the stitch, then bring both ends together and thread those through the button. Slide the button down on to the stitch and place the stitch back on the needles.
2-hole buttons: First pull the stitch from the back of the button to front through one hole, and then the same loop from the front of the button to the back through the second hole.
And that’s it
Really. That’s all there is to it.
I’ve also written a guide on some of the buttons I use most often and what features of shank buttons to avoid. If you’d like to learn more you can in this free article here.
Let me know how you got on or if you have any questions in the comments below.
Best wishes, Sam xox

6 Comments
Caroline Fraser · 1st May 2021 at 12:43 pm
Genius! Thank you for sharing 😁
Cassa · 13th April 2022 at 11:35 pm
Great idea thanks
Patricia Benson · 21st April 2023 at 1:50 pm
A question – once you have the shank button on the RH needle, do you work/knit that stitch, or is it a slipped stitch? TY
Samantha Main · 21st April 2023 at 8:20 pm
Hi. It doesn’t make a lot of difference either way. I have tried both ways and I usually just slip it now.
Patricia · 17th May 2023 at 3:56 pm
Thank you for that. One other question – have you found a new supplier for your black hexagon buttons?
Samantha Main · 18th May 2023 at 10:34 am
Hi. Unfortunately not. There are some hexagonal shank buttons on ebay, but they are not the same and are much larger than the ones used in the tutorial.