Each month I am trying to push myself out of my comfort zone, and make a special square for the charity Hug In A Blanket.
For June, I chose Leonardo from the Teenage Mutant Ninja Turtles, as he is a favourite in this home.
So here is the step-by-step making of Leonardo the ninja turtle in crochet…
Two 4 chain circles in black for his pupils, and two white ovals for his eyes (4 ch, one round of trebles, plus 1 sc, 2 sc x 3, 1 sc, 1 ss)Eyes sewn together.A large green circle. This is 5 rounds of trebles. Next his blue bandana. This is 12 rows of trebles 4 sts wide. I think – check the length against the large green circle as you go to be sure.Next two long chains long enough to be sewn around his eyes twice.To start constructing Leonardo first the bandana is sewn on just above the centre line of the green circle, and then eyes with the bottom of each eye in line with the bottom of the bandana.Next to sew on are the long chains – one for each eye. Start at the bottom and sew the chain upside down. The first round was flush next to the eye, and the second round overlapping the first round and the eye. It doesn’t matter if the chains are a little long and hang at the bottom. This can be pulled through to the back.Next chain 4 sts. Treble once into the second chain, then treble twice into the first chain. Bind off.And sew these on to the left hand side of the bandana.Next is the nose and mouth. First you’ll need a black chain 18 chain sts long. This is the smile. Second is the mouth. I’m not entirely sure exactly what stitches I did here. It’s a red triangle with 4 sts on each side. Then a row of black sc along two edges, and another row of green sc. Last you’ll need the nose. This is two rounds of trebles, then 2 ch & a treble in one stitch, 1 tr in the next stitch, 2 tr, 1 tr, 2 tr, 1 tr, 2 tr, 1 tr, 2 tr, 1 tr, 2 tr, 1 tr, 1 tr, 1 sc, 1 ss. This part row is the top of his nose.With right sides facing, sew the mouth to the bottom of his nose (the bit without the part round).Sew the nose and mouth on to the head. The nose should just overlap the bottom of the bandana and his eyes. My sewing wasn’t so great on this bit as I missed his eyes and it’s a little lopsided 😂 Note that you can add a bit of stuffing to make the nose a bit 3D if it’s suitable for the projects recipient.And lastly the smile is sewn on.
I’m still not happy with that nose. But it was my third attempt and it wasn’t until it was sewn on that I decided I didn’t like it. If I ever figure out a better nose I’ll update this post. 🙈
Do you have any suggestions for the nose?
Best wishes, Sam xox
P.S. If you want to receive new articles from us directly into your inbox, then please sign up below.
Thanks for sharing this pattern. He is very cute. If you want perhaps make the nose a bit smaller and add a small amount of stuffing to make his nose protrude a little. However I like him just as he is.
Take care and best wishes.
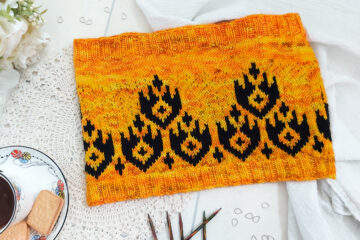
Bring the quiet magic of the season to your needles with the Winter Joy Cowl. Featuring a central wintery snowflake motif framed by delicate rows of angels, this stranded colorwork cowl is a cosy project for cold-weather crafting.


1 Comment
Debby · 13th October 2025 at 4:15 pm
Thanks for sharing this pattern. He is very cute. If you want perhaps make the nose a bit smaller and add a small amount of stuffing to make his nose protrude a little. However I like him just as he is.
Take care and best wishes.