When you knit a lot of projects you tend to end up with lots of small balls of leftover yarns. Even more so if you make a lot of small projects.
And it can be hard to know what best to do with them.
I myself have a few patterns I make that will help with some of the larger balls, such as preemie baby cardigans, blanket squares, or fingerless mittens for charity.
I also have a twiddlemuff pattern which is fantastic for using up the last bits of yarn, but not everyone has somewhere to send twiddlemuffs.
Baby blankets however are typically easier to find homes for, whether for family or friends, or a local charity.
So I want to share this pattern with you to give you another tool in your kit for using up the last bits of yarn that might appear to be multiplying in your stash.
Blanket Guidelines
Yarn Weight
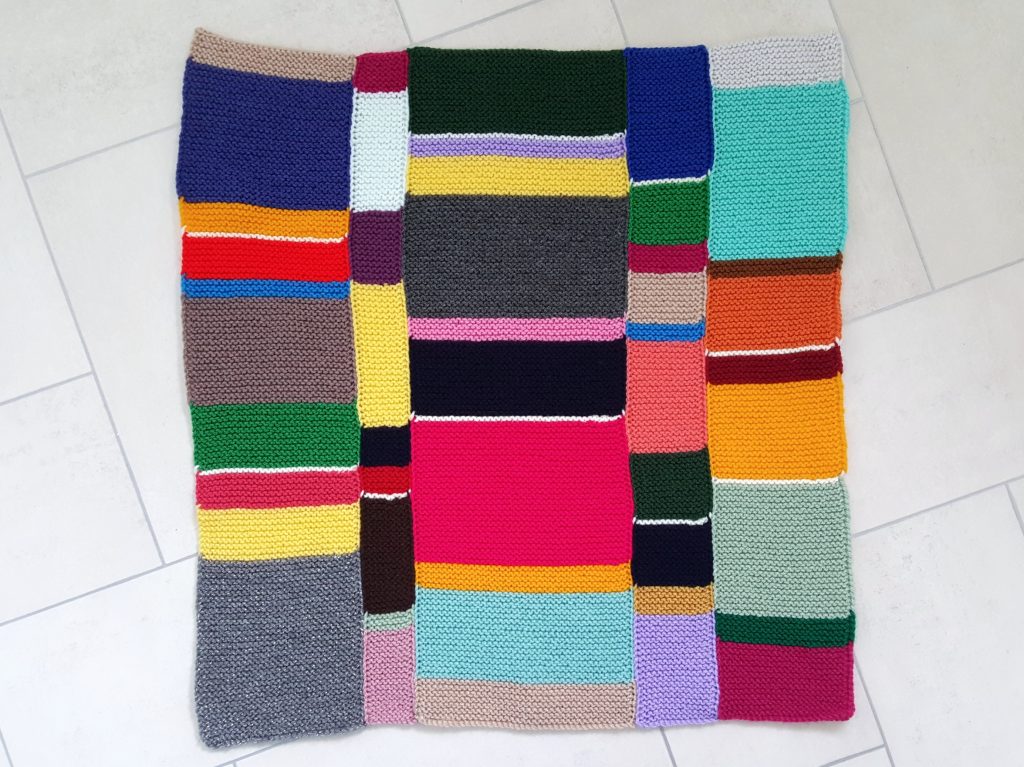
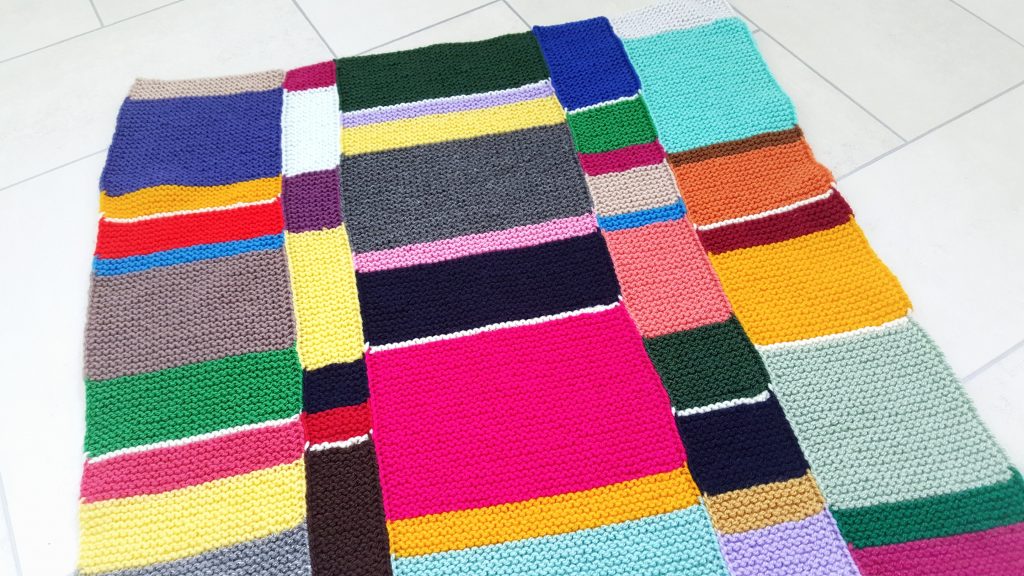
I recommend using the same yarn weight throughout the blanket. The sample shown uses standard DK weight yarns throughout and weighs 190g in total.
Needles
Choose a needle size that is suitable for the yarn weight you are using. For aran weight I’d recommend a 5mm needle. For DK I’d recommend a 4mm needle, which is what I used in the sample. For fingering weight yarn I’d recommend a 3mm needle, maybe a 3.5mm.
You needn’t worry about needing to use a long circular needle as the blanket is worked in short columns and later sewn together. Standard straight needles would suffice.
Blanket Size
The blanket sample shown is a suitable size for a baby blanket, coming out at 55cm x 60cm. However, you can make a larger blanket simply by knitting more columns and rows to suit your needs. For a list of the most common sizes check out this post from The Snugglery.
Column Widths
I recommend adjusting the width of the columns to add variation and interest. But you can make them all the same width if you prefer. The sample below was made using 5 columns, all of different widths.
Colour Changes
When knitting the rows you can knit the full ball of leftovers you have, or you can use up some of it, and use the rest of it later on in the same blanket. If you have larger sized balls I recommend using bits of it in different columns as this brings some cohesiveness to the finished blanket. For example the navy blue I used is in three different columns.
When deciding when to change colours another things I did was to lay the columns out on the floor and try to make sure most of my colour changes were not next to a colour change in the neighbouring column. This didn’t work in all instances, but it helps to add interest to the finished blanket.
I also recommend finishing each colour block on a wrong side row. This gives you a crisp colour change.
Optional: as a design element I did one line of white yarn randomly throughout the blanket. This is two knitted rows which is one garter ridge.
Blanket Instructions
The blanket is first knitted in individual columns. These columns are later sewn together to create the full blanket.
The sample shown uses:
– DK weight yarn
– 4.00mm needles
– 5 columns of 30sts, 10sts, 40sts, 15sts, and 25sts
– 240 rows (this is 120 garter ridges) per column
Cast on stitches for the first column. I used a cable cast on, but a long tail cast on is also suitable.
Knit a total of 240 rows (this is the same as 120 garter ridges) changing colours as you go. I slip the first stitch of every row purlwise to create a neater edge for sewing up, but this is optional.
Cast off.
Repeat for the remaining columns.
Sew the columns together using your preferred method.
Optional: Block your blanket if you want.
Weave in and trim the ends.
Enjoy using this pattern recipe and making good use of your leftovers!
Best wishes, – & happy crafting
Sam xox


0 Comments